Common Potato Growing Mistakes to Avoid This Season
Common Potato Growing Mistakes to Avoid This Season
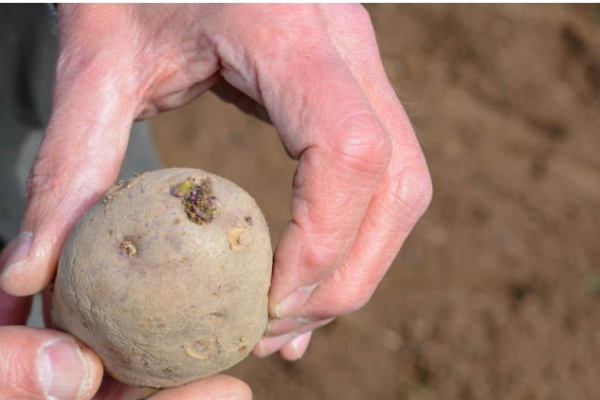
Planting Potatoes Without Eyes
The eye of the potato is the most important part of the tuber when planting, as this is where it grows into a new plant.
Forgetting to check seed potatoes for “eyes” is the most common beginner gardener mistake. Potato eyes are the buds on the potato skin where sprouts emerge. You may have noticed them if you’ve ever had potatoes accidentally sprout in your pantry. The eyes look like dimples or little nubs, and they are arguably the most important part of the seed potato.
Seed potatoes are technically clones of a mother potato plant. When planted, they grow into new potato plants that produce an abundance of tubers. However, if your seed potatoes don’t have “eyes” or growing points, there is no way for them to sprout new leaves and stems.
Common Mistake:
When cutting seed potatoes into smaller chunks, beginners sometimes forget to leave enough buds on each block of seed potato. When these seed potato chunks are planted, they don’t sprout and end up rotting in the ground.
Another common mistake is accidentally bumping, damaging, or removing potato sprouts before planting.
How to Avoid It:
Check that every seed potato, or seed potato chunk, has at least 2-3 eyes per plant. Eyes that have already sprouted (whether through “chitting” or being exposed to light in your kitchen) should be handled carefully so the sprouts aren’t disturbed.
When planting the seed potatoes in the spring, be sure that the eyes or sprouts are facing upwards so they can grow stems and leaves up toward the sunlight.
Growing Store-Bought Potatoes
Store-bought potatoes should not be used to grow potatoes in your garden.
Most people don’t realize how chemical-laden potatoes are. When they are grown in industrial monocrops, a frightening volume of toxic chemicals, including carcinogens, pesticides like chlorpropham, and bee-harming sprays like imidacloprid. Yet another reason to grow your own spuds so you know exactly what’s going into them!
But the biggest problem for beginner gardeners arises when trying to plant potatoes they purchased from the grocery store. At a glance, these spuds look just like the more expensive “seed potatoes” purchased from a seed catalog.
But, when they are harvested, store-bought potatoes are also often treated with chemical sprout inhibitors so that they can be transported long distances and sit on grocery store shelves without sprouting. Gardeners who try to plant these potatoes will be woefully disappointed because the potato won’t be able to grow sprouts from its eyes like a standard seed potato.
Common Mistake:
Purchasing conventionally-grown potatoes from the grocery store and trying to plant them to grow new potato plants usually leads to crop failure due to sprout-inhibitors that were sprayed on the tubers.
How to Avoid It:
The best source for seed potato planting stock is a reputable garden store, nursery, or seed company. If you want to grow potatoes from grocery store spuds, be sure that you purchase USDA-certified organic potatoes. These have not been treated with chemical sprout inhibitors and will readily pre-sprout in your kitchen or greenhouse.
Planting Too Close
There should be plenty of space in between potato plants for them to grow freely with lots of airflow.
Potato plants require about 12” of space between plants and 24-26” of space between rows to grow to their fullest potential. Extra-large varieties may need up to 18” of space between plants, while fingerlings and smaller potatoes can be spaced as close as 8”.
When potatoes are planted too close, they can become overcrowded, stressed out, and more susceptible to disease.
Common Mistake:
Packing more seed potatoes into a smaller area will not necessarily increase yields. In fact, it can often result in smaller plants, smaller potatoes, and less overall vitality in the planting. Just like humans crammed into a subway, potatoes really don’t enjoy being overcrowded.
How to Avoid It:
Lay out a tape measure at the time of planting to ensure that seed potatoes are placed about 12” apart (depending on variety). If potatoes are moved during hilling or emerge too close together for whatever reason, thin out the less vigorous plants to allow the larger plants to thrive.
Failing to Hill Potatoes
Hilling is a very important step in the potato-growing process that should not be skipped.
We all know that potatoes prefer to be underground. These tubers are technically enlarged or thickened portions of the plant’s rhizomes. The plant uses these swollen stems as a source of nutrient reserves deep in the soil.
As it photosynthesizes, it funnels its extra minerals, water, and energy down to the root zone. This is why tubers are so starchy, tasty, and filling.
However, problems arise when potato tubers are exposed to sunlight above the ground. Like many of their wild relatives in the nightshade family, potatoes can accumulate a poisonous compound called solanine when they are exposed to light.
This is why you never see green-skin potatoes sold in stores. It is also why potatoes are not eaten raw. Potatoes are vegetables that grow best in the shade, and should be stored that way too!
Keeping potatoes buried and away from sunlight ensures that they are 100% safe foods without harmful levels of solanine. Potato tubers want to develop in complete darkness, so mounding soil on top of the plants (“hilling”) is a must.
Common Mistake:
If you forget to “hill up” potatoes as they grow, you may notice tubers popping out of the ground and emerging above the soil surface. Beginner gardeners often see potato foliage growing abundantly and forget to check that the base of the plant is thoroughly covered.
How to Avoid It:
Potato hilling is simply using a shovel, rake, or your hands to mound soil on top of potato hills. It’s usually best to do the first hilling when the foliage is 6-8” tall. These initial mounds of soil can be up to 4” up the plant’s base in a broad, widened hill shape.
Repeat the hilling process with an additional 2-4” of soil every few weeks until your potato mounds are 10-12” tall. You can also mulch with chopped leaves or straw to keep the soil cool, out-compete weeds, and prevent the greening of the potato skins.
Not Enough or Too Much Irrigation
Too much water can cause a number of problems for your potatoes, as with too little water.
In an ideal world, potatoes would prefer 1-2” of water per week through rainfall or irrigation. The soil should remain consistently moist and never completely dry out. Fluctuations in soil moisture can be problematic for yields as well as potato quality.
Not enough water or erratic watering can lead to wilted leaves and shriveled, dried-out potatoes. When the soil is dry from drought, potatoes are less likely to size up or produce an excess of tubers.
Remember that the potatoes we eat are the plant’s storage organ. If the plant isn’t getting enough water and energy to fuel its growth, it won’t have anything left to send down into below-ground storage.
On the other hand, too much water can cause premature rotting in the ground. I’ve seen potatoes literally disintegrate into mush when they are grown in waterlogged, swampy soil. Those tubers are definitely not appetizing!
Common Mistake:
Beginner gardeners sometimes get a bit overzealous with their watering habits, or they may plant potatoes and then ignore them altogether. Potato foliage can wilt from soil that is too dry, or it can look droopy from sitting in drenched mud. If you don’t stick your finger in the soil and check the moisture levels at least 6” down, you won’t know how much water your plants are really getting.
How to Avoid It:
Amend soil generously with compost or organic matter before planting. This will help ensure proper drainage while also improving the water holding capacity of the soil. Avoid planting potatoes in heavy clay, waterlogged soil.
Don’t let your potato beds dry out. Check the soil moisture at least once per week throughout the summer. Be sure to use drip irrigation or soaker hoses to water your potatoes during periods of drought. You can also use a chipped leaf or straw mulch to help maintain cool, consistently moist soil.
Not Enough or Too Much Fertility
Adding organic matter to your potatoes when you plant them will help ensure they grow to their potential.
Those huge baked-potato-worthy spuds need a lot of nutrients to form. Potatoes are moderate to heavy feeding crops that need ample fertility to yield. Without enough nitrogen, phosphorus, potassium, and micronutrients, potatoes may look yellow, pale, small, or not grow at all.
However, over-fertilized potatoes may produce way too much green foliage and very few actual potatoes. This doesn’t do much for us as gardeners hoping to harvest the nourishing below-ground tubers.
Key signs of too much nitrogen fertilizer, in particular, include deformed or rolled up leaves, aphid infestations, and disease issues.
Common Mistake:
If you forget to fertilize or amend your potatoes with organic matter, you may only yield small, underdeveloped tubers. On the flip side, over-fertilizing can lead to an excess of foliage and greenery with very few actual potatoes. Many gardeners forget to follow package instructions or they grow potatoes in depleted soils that haven’t been amended with mineral-rich organic matter.
How to Avoid It:
Mix a generous heap of compost or rotted manure into the soil before planting potatoes. Amend with an all-purpose organic granular fertilizer or feather meal at the time of planting. Each potato plant needs about ⅕ ounce of nitrogen for the season. This is often about a handful of granular 4-6-3 fertilizer per plant, or 1½ cup per 10 square feet of garden space.
Once the plants are established, provide a nice foliar spray of diluted fish fertilizer or another potassium-rich fertilizer every 3-4 weeks. Be sure to only fertilize in the morning or evening to avoid burning the leaves.
Too Much Weed Competition
Weeds can take over your garden so it is best to get rid of them as quickly as possible.
A weedy garden isn’t good for any crop, but potatoes can be susceptible to competition in their early stages. Early emerging weeds within 1-2 weeks of planting potatoes can cause up to 50% yield reduction.
This is because weeds shade out young plants and steal their water and nutrients. If you don’t mulch or weed your potatoes, you may be disappointed by low vigor and a lack of tuber growth.
Common Mistake:
Forgetting to weed potatoes before they are established can lead to overgrown weeds that shade out or out-compete young potato plants. Inexperienced gardeners may accidentally rip out potato plants by pulling larger weeds without holding the potato plant roots in place. Hoeing too close to the plants can also damage the tubers or stems.
How to Avoid It:
Check your potato patch at least once a week to ensure that weeds aren’t taking over. Mulch generously with organic straw or chipped leaves to keep the weed pressure down.
When pulling larger weeds, hold the base of the potato plant with one hand and gently yank the weed with the other. This will ensure that you don’t inadvertently disturb your crop roots. If using a hoe to remove smaller weeds, be very careful not to scrape or cut the base of the potato plants.
Posted
3 years ago
No comments yet! Why don't you be the first?


Add a comment